- Oct 15, 2019
 0
0- by A2 Marketing Team
With the ever-increasing number of cyber attacks these days, security is critical for every website owner. If you are hacked, you could lose valuable personal data. Even worse, your entire website could be compromised.
Fortunately, there are security measures you can put in place to protect your site. One of the most effective options is Two Factor Authentication (2FA). This security feature adds a second step to the login process, making it much harder for hackers to access your account.
In this piece, we’ll discuss why 2FA is important, and explain how it works. We’ll then provide a step-by-step guide for setting it up on your hosting account. Let’s jump right in!
Why Two-Factor Authentication Can Improve Security
2FA is an important security feature, which can help prevent hacks and data breaches. Passwords, no matter how complex they are, can be hacked. Data thieves may employ brute force attacks to do so, or even find the answers to your security questions by researching your social media profiles.
In 2018 alone, over 16 billion dollars were stolen by cyber criminals. As a result, online security for your accounts and your website is more important than ever. In light of this fact, 2FA can provide some solid defense against hackers and other online threats
So how does this technology work? 2FA is a second step to the login process, which double-checks to make sure your identity is legitimate. When logging in, after you input your password and username, you will be required to provide one more piece of information in order to access your account.
This information is often a one-use password or pin number, which is generated by another object in your possession, such as your mobile phone or tablet. In some cases, however, this second step can be something more advanced, such as a fingerprint or a retina eye scan.
Either way, this additional information needed to access your account will make it difficult for hackers to get in. They would need not only your username and password, but also access to your phone or other personal device. For that reason, it’s an excellent method for securing all kinds of accounts.
How to Set Up Two-Factor Authentication on Your Hosting Account (In 4 Steps)
Now that you understand how 2FA works in a general sense, let’s talk about how you can set it up on your hosting account. Here at A2 Hosting, we use a password generated on a mobile device as your second layer of protection.
We do this because only you, and maybe others close to you, will have access to that device. For this reason, our 2FA system provides powerful protection against cyber attacks. All you need to do is set it up.
Step 1: Install an Authenticator App on Your Tablet or Smartphone
First, you’ll need to install an authenticator app on your smartphone or other device. Fortunately, there are several to choose from, depending on your device and personal preferences.
Some of the common options include Google Authenticator and Microsoft Authenticator, which we have chosen to use here:
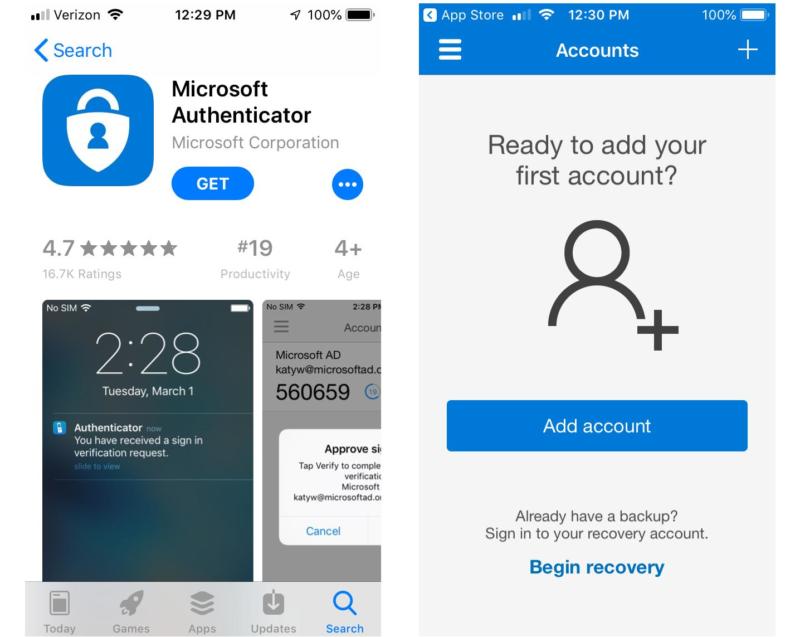
After you have installed the app on your mobile device, you’ll be ready to add an account to it. However, before you can do that, you’ll need to activate 2FA on your hosting account.
Step 2: Enable 2FA for Your Account
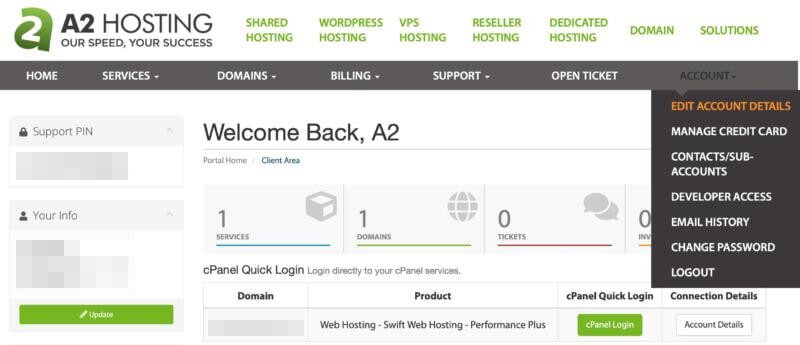
To enable 2FA on your hosting account, begin by logging in to your A2 Hosting Customer Portal. From there, click on Account > Edit Account Details:
Next, you’ll be taken to the My Details page. Click on Security in the My Account sidebar to the left. This will bring you to a page where you can enable 2FA for your account:
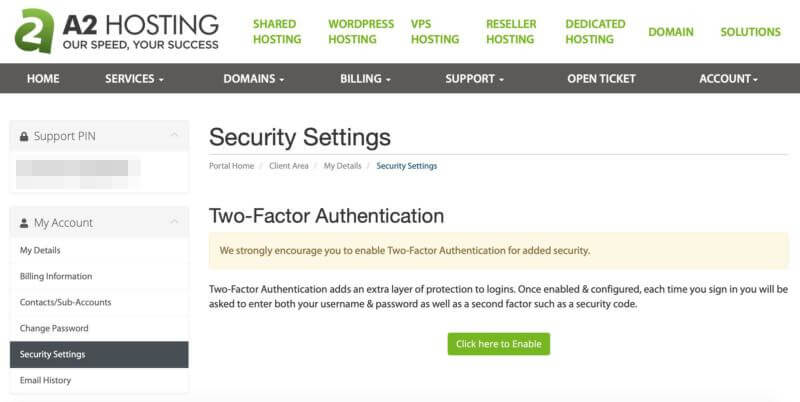
Simply select the green button that says Click here to Enable. This will start the 2FA setup process.
Step 3: Input the Verification Key
Next, you’ll link your hosting account to your authenticator app. To do this, select Get Started on the Two-Factor Authentication Setup Process pop-up window:
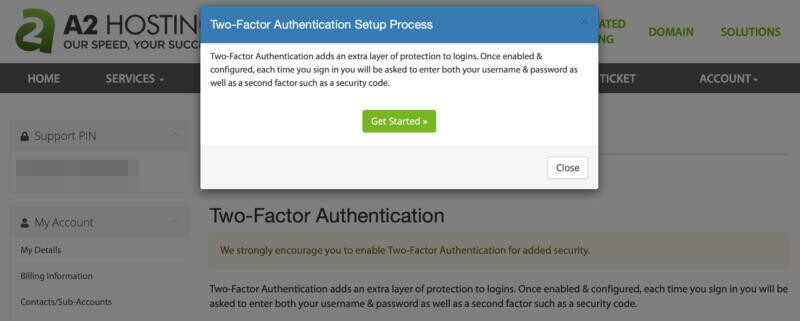
This will bring up a QR code. Embedded within this code is a one-time password that you need to configure your authentication app. It should also be noted that the password is also displayed directly, in case you need to enter it manually.
Return to your authenticator app, and choose to add a new account. Depending on the app you are using, this will either bring up your camera to scan the QR code, or you’ll be prompted to manually type the code in. Either way, once you do that, the app will return another code, which you can then input into your A2 Hosting account.
Once you’ve completed this process, you should receive a success message:

You will also receive a backup code. Write it down and keep it in a secure place. This code can be used to access your account in the event that you lose your device or don’t have access to it.
Step 4: Test to Make Sure 2FA Is Working
Finally, it’s time to test to make sure 2FA is working on your account. Go ahead and log out of your account, and return to the login screen. Now, after you type in your username and password, you should be presented with another screen asking for a second factor to complete your login:
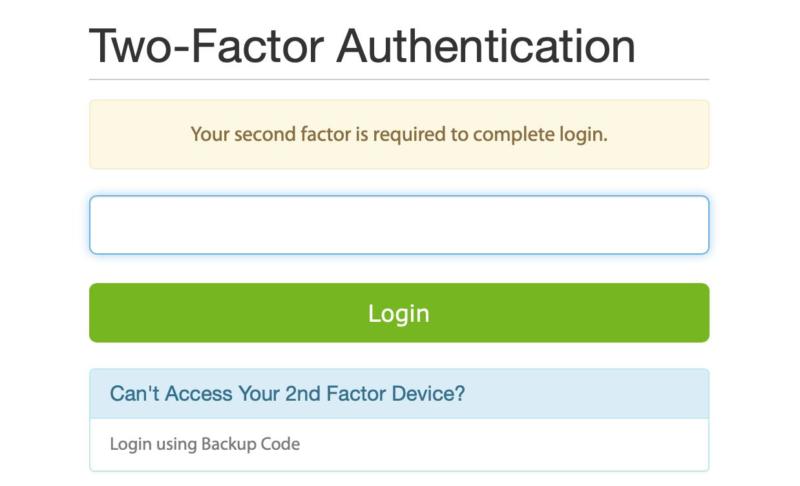
Pull up your app, and it will provide you with a code. Enter it, and then select Login. With that, 2FA setup is complete, and your hosting account is far more secure.
Conclusion
Security is paramount for every website. Fortunately, 2FA is an effective method you can use to protect yourself from hackers. In addition, it is easy to set up, and comes built into your A2 hosting account.
As we’ve seen, there are four simple steps for enabling 2FA on your account. To review, they are:
- Install an authenticator app on your tablet or smartphone.
- Enable 2FA for your account.
- Input the verification key.
- Test to make sure 2FA is working.
Image credit: Pete Linforth.


