- Jun 29, 2018
 0
0- by A2 Marketing Team
Instagram is a social media juggernaut, and most websites can benefit from a presence on the platform. Without one, you might lose out on a lot of potential leads. The problem is that it can be a hassle to re-post all your Instagram content to WordPress, especially if you update your site often.
Fortunately, WordPress is nothing if not flexible. By using the right tools, you can automate the process of sharing your Instagram content on your website. This means that you don’t have to copy the content over manually every time you post something new.
In this article, we’re going to talk about the upsides of integrating Instagram with WordPress. We’ll then teach you two ways to get the job done. Let’s get to it!
Why Integrating WordPress With Instagram Makes Sense

There are several ways to integrate WordPress with Instagram, depending on what you want to accomplish. You could, for example, simply display your Instagram feed on your site. Another option is to turn your latest pictures into posts that are published automatically.
The benefits to these kinds of integrations are straightforward:
- You can use one platform to grow the other. Visitors can be funneled back and forth between the two platforms, increasing your audience on both.
- You can reach users you’re not currently targeting. By integrating your Instagram content into WordPress, you can reach a lot of users you might not be able to attract through social media alone.
If you’re a good photographer, you can also liven up your website with your Instagram content. This strategy can even help you engage a different type of audience. With that in mind, let’s talk about the technical details combining the two platforms.
2 Ways to Integrate Instagram With WordPress
Now, we’re going to look at how you can integrate your Instagram content with your WordPress website. There are two primary ways of doing this – one that requires a plugin, and one that takes advantage of an external tool.
1. Add Your Instagram Feed to WordPress
Adding your Instagram feed to WordPress is a perfect way to showcase your posts. For example, if you have portfolios on both Instagram and WordPress, you only need to post your work to Instagram in order for it to appear on your website as well.
To achieve this, you can use the Instagram Feed WD plugin, which enables you to link Instagram to WordPress with minimal effort. This plugin offers multiple layouts for your integrated feed, so you have full control over its appearance:

To get started, install and activate the plugin. You’ll see a welcome screen, including an informative video talking about the many ways you can use the plugin. When you’re ready to begin, click on the Start Using button at the top of the screen:

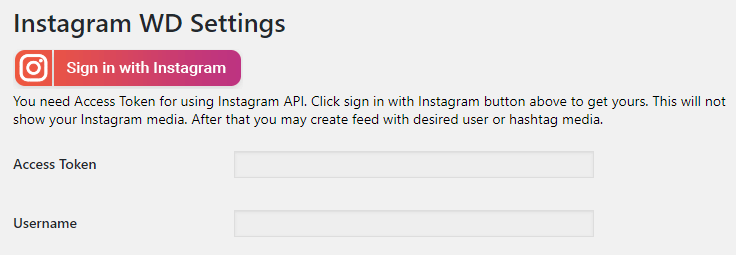
Instagram Feed WD requires you to log in with your Instagram account. Click on the Sign in with Instagram button now, and the plugin will autofill the forms below. When that’s done, click on Save Changes:
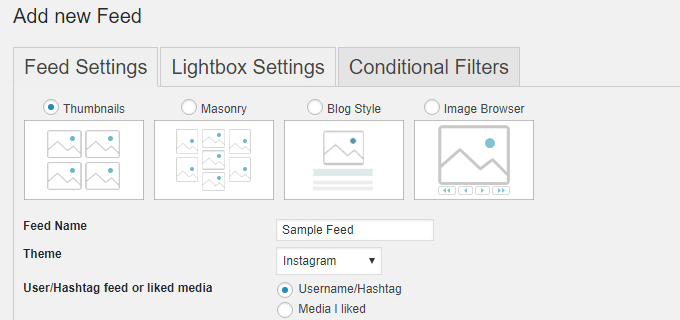
Now, head to the Feed WD > Feed tab on your dashboard, and click on Add New. The plugin will ask you to choose a layout for your feed, and to configure its lightbox settings:
When your feed is ready to go, all that’s left is to publish it on your website. There are two ways to do this. The first involves opening the WordPress editor for any of your pages or posts, and clicking on the Add Instagram Feed button. You’ll be able to pick which feed to add, and the plugin will generate a shortcode for it:

Your second option is to add your feed using a widget. To do that, go to the Appearance > Widgets tab and drag the Instagram WD Widget to the sidebar or footer where you want it to appear:
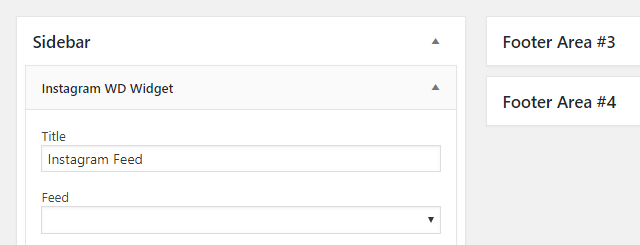
Using this option, you can still choose which feed to display, set a title for it, and specify how many columns and images it should include. Here’s an example of what a regular feed looks like when inserted on a page:

This plugin offers plenty of customization options, so you can change how your feed looks if you’re not happy with the initial results. Feel free to play around with the settings until you get it just right.
2. Auto-Post Your Latest Instagram Pictures to WordPress
For this next integration, we’re going to configure WordPress so that it publishes your new Instagram pictures as posts automatically. This time around, we’re not going to use a plugin. Instead, we’ll set up an IFTTT (If This Then That) ‘applet’. In case you don’t know, IFTTT is a service that enables you to link platforms together:

With IFTTT, you can configure specific actions on one account to trigger responses on a second one. For this applet, we’ll set up new Instagram posts using a specific hashtag as our trigger, and a new blog post as the response.
To get started, create an account on IFTTT and connect it to Instagram, then do the same for your WordPress account. Once both platforms are connected, go to My Applets > Services > Instagram. Inside, you’ll find a list of all the applets you can use with it:

The applet we’re looking for already exists (as do many others). Simply scroll down until you find the option that reads Automatically turn specific Instagrams into photo posts:

When you turn on the applet, it will ask you to set a hashtag to trigger your Instagram WordPress posts. We recommend going with something simple, such as #WordPress:

Next up, you’ll be able to configure which category to publish your new posts under, as well as any tags they should include:
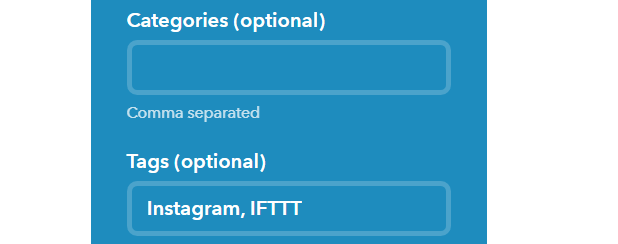
Finally, you can set whether your Instagram posts should be published automatically, saved as drafts, or set to private. We recommend going with the first option, since otherwise you’ll have to approve publications manually:

Click on the Save button when you’re done, and that’s it! Now, each time you add the #WordPress tag to one of your Instagrams, IFTTT will create and publish a corresponding post in WordPress.
Conclusion
You may already have a personal Instagram account. However, you might not have set up one for your website just yet. As far as social media goes, few platforms are as influential as Instagram. By integrating it with WordPress, you can maximize your reach and share traffic between your website and profile.
There are plenty of ways to integrate Instagram with WordPress. In this article, we’ve walked you through the following two approaches:
- Add your Instagram feed to WordPress using the Instagram Feed WD plugin.
- Auto-post your latest Instagram pictures to WordPress using IFTTT.
Image credit: Pixabay.

