- Oct 22, 2019
 0
0- by A2 Marketing Team
When working with PHP, you’re going to have to manage your dependencies. As your project develops, however, the number of dependencies you are using is likely to grow. If you are managing them manually, this can quickly become overwhelming.
As such, it’s important to employ a system that enables you to work more efficiently. Composer, for example, is a dependency manager for PHP that enables you to list your dependencies in a composer.json file. Then, with a few simple commands, it will automatically download your project’s dependencies and set up autoloading for you.
In this piece, we’ll begin by explaining what dependencies are in PHP, and discussing how difficult it can be to manage them manually. Then we’ll show you how Composer can make this process easier. Let’s get to work!
An Introduction to Dependencies in PHP
Dependencies are PHP libraries, frameworks, and components that you can use in your web development projects. They help to make coding easier and more efficient, and most projects will rely on a number of them.
The issue with dependencies lies in how difficult they can be to manage. The more of them you incorporate into a project, the harder it is to keep track of all those moving pieces. What’s more, managing them manually is often tedious and time-consuming.
For this reason, it’s critical to find a solution for managing your dependencies in PHP more effectively. There are several solutions that can help with this problem, but we’ll focus on one of the more powerful and accessible options.
How Composer Can Make Managing Dependencies Easier

Composer is a dependency manager built specifically for PHP. It works by providing a file for you to list the dependencies you are using.
For instance, you can list the dependencies for your project in a composer.json file, which will enable you to access those files whenever you need them. With this system in place, you will no longer have to worrying about having to locate and re-download key assets.
On top of that, Composer is a free and easy-to-use tool, which also happens to be open source. If you’re not yet convinced to give it a try, however, let’s take a closer look at how it works.
How to Manage Dependencies in PHP Using Composer (In 4 Steps)
When it comes to dependency management, Composer is a popular choice. It only takes a few simple steps to get it set up and start using it.
Step 1: Download and Install Composer
To begin with, you’ll want to pull up your favorite HTML editor. From there, run the following script in your terminal to install Composer in the current directory,:
php -r "copy('https://getcomposer.org/installer', 'composer-setup.php');"
php -r "if (hash_file('sha384', 'composer-setup.php') === 'a5c698ffe4b8e849a443b120cd5ba38043260d5c4023dbf93e1558871f1f07f58274fc6f4c93bcfd858c6bd0775cd8d1') { echo 'Installer verified'; } else { echo 'Installer corrupt'; unlink('composer-setup.php'); } echo PHP_EOL;"
php composer-setup.php
php -r "unlink('composer-setup.php');"
These four lines of code will download the installer, verify and run it, and remove it when the process is finished. Just like that, you’re ready to get started, although you may also want to run this line of code next:
mv composer.phar /usr/local/bin/composer
By default, Composer will install locally to a project. However, this command will move it to your local bin directory, so you can easily use it anywhere.
Step 2: Create a New File to Manage Your Packages
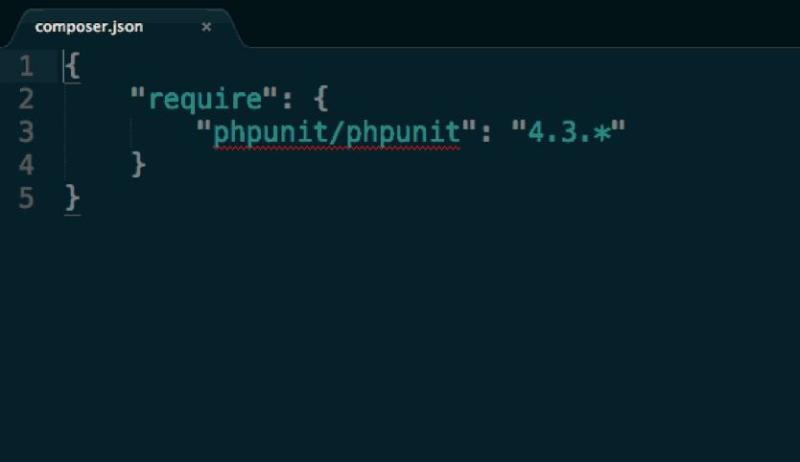
Next, you need to create a new folder on your system. Within that folder, create a blank file called composer.json, and add the following code to it:
{

        “require”: {

            “phpunit/phpunit”: “4.3.*”

        }

    }
With that done, you have just created the file where you will list all the packages you are using in your project. On the next line, you can list the first package:

You must include a vendor name, project name, and version number, in the following format. The first part is the vendor, followed by the project name, and then the version number in brackets:
phpunit/php-code-coverage {2.0.11}Start a new line for each package, and repeat this process until you have input all the packages you are using. Also, it should be noted that the version numbers should be written using the standard semantic versioning notation.
Step 3: Install the Dependencies You Will Need For Your Project
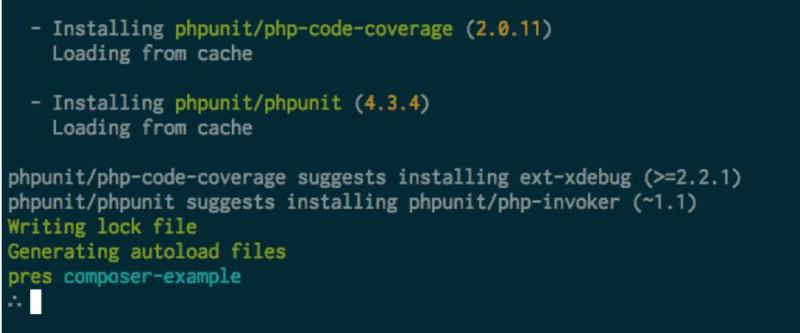
With that complete, you’re ready to install your dependencies. In your terminal, type “composer install” and run the command:

Now, you’re just about ready to create a new file and get to work. However, before you can dive fully into your project, you’ll probably want to set up autoloading.
Step 4: Set Up Autoloading to Make Development Easier
Autoloading will fetch dependencies from your list to meet the requirements of your code. To use this handy feature, you’ll need to open a PHP tag in your project file and add a single line of code:
`require ‘./vendor/autoload.php’;`
When you installed your dependencies using the Composer install command, the ‘autoload.php’ file was created. This file will make your current dependencies available to your project file. The best part is that, since this is a command line tool, it installs that command in the vendor/bin folder for you to use. That way, the package does not have to be installed system wide.
With that, you’re done. Of course, now the real work begins. It’s time to start coding!
Conclusion
Using a dependency manager provides instant access to your packages, frameworks, and other components during a project, as and when you need them. As a result, you can save yourself the headache of having to download them each time.
Fortunately, it’s easy to install and get started with Composer in just four steps:
- Download and install Composer.
- Create a new file to manage your packages.
- Install the dependencies you will need for your project.
- Set up autoloading to make development easier.
Image credit: Pexels.


