- Jan 21, 2019
 0
0- by A2 Marketing Team
Your website is important both to you and to the people who use it. The last thing you want are errors that result in hours of work to get your site back to a functional state. However, installing a new update, theme, or plugin without testing it first could lead to that exact problem.
This is why it’s a wise idea to use a staging website, which is a private copy of your site that lets you test out new features before you implement them on the live version. Staging sites enable you to work on creating or updating your WordPress site, without posing a threat to it (or having to temporarily close it down). They can also save you a lot of time and energy in the long run.
In this article, we’ll explain what a staging site is, and discuss when using one can be of benefit to you. We’ll also show you how to create a WordPress staging site using Softaculous in your A2 Hosting control panel. Let’s get started!
An Introduction to Staging Sites
In simple terms, a staging site is just a copy of your live website. It serves as a testing site for updates, themes, plugins, and other features, before they are implemented on your real site. If an update causes an error or a plugin introduces a bug when installed, only the staging site will be affected. In contrast, the live site will remain intact.
A major benefit of staging sites is that they are private. You can run your staging site locally on your computer, or have it hosted online. Either way, if it’s set up correctly it should not be picked up by search engines or viewable by the general public.
This enables you to test out new features, without your visitors seeing a messy work-in-progress. They can continue to visit and use your site without any interruptions. Plus, you can push your fixes or changes live all at once (and only when you’re ready).
When to Use a Staging Site (And When Not To)
As we’ve mentioned, staging sites are important for preventing errors and bugs on your live site. This function is particularly important if you are running a site that generates income, or one that provides information users need round-the-clock access to.
If your website generates income, directly or indirectly, every second that your site is down due to an error is money lost. It’s far better to spend the time to test updates on a staging site while your live site continues to function.
Likewise, if your website provides important information that needs to be easily accessible to its users at all times, it is best to do everything you can to prevent your site from going down (even temporarily). Leaving your visitors unable to use necessary resources is a good way to make them think about leaving your site for a competitor’s.
Finally, along with testing for potential errors, staging sites are also handy when you’re building a brand-new website. Instead of having a half-completed and unprofessional-looking site viewable online while it’s under construction, you can create a private staging site, and then make it live once it’s ready to go.
There are drawbacks to using staging sites in some situations. Generally speaking, you run the risk of creating problems any time you use a staging site to edit content that’s stored in the database, while the version on the live site is still changing.
For example, if you edit a blog post via a staging site while a user is posting a comment to the live site’s version, you may lose that new comment when you implement your changes on the live site. Similar issues can arise when editing content in e-commerce stores, forums, or on any other site where users can create and post their own content.
That means you’ll want to exercise caution when changing dynamic content via a staging site. On the other hand, staging sites are invaluable for testing out large-scale changes like updates. They’re also handy when building new sites and performing troubleshooting.
How to Create a WordPress Staging Site Using Softaculous (In 4 Steps)
There are many ways to create a staging site, but A2 Hosting customers have it easy. You can set up your staging site using Softaculous, an auto-installer that manages application backups and updates. Over the next four steps, we’ll show you how to set up a WordPress staging site with nothing but an A2 Hosting account.
Step 1: Set Up Your Staging Environment
The first thing you’ll need to do is to create either a subdomain or an addon domain. This will be the ‘home’ environment for your staging site. Which option you choose is up to you, as both will get the job done. Just keep in mind that a subdomain is a part of your site’s overall domain, while an addon domain will function like a new website.
Either way, both types can be created in the Domains section of your A2 Hosting control panel. For more detailed instructions, you can check out our guide to configuring a subdomain, or our article on creating an addon domain. It’s also best to perform a full site backup before continuing, just in case.
Step 2: Log in to cPanel
Next, you’ll want to log into cPanel if you haven’t already. The simplest way to do this is by navigating through your A2 Hosting customer account.
Log into your account, and navigate to Services in the menu at the top of the screen. Then select My Services from the drop-down menu:
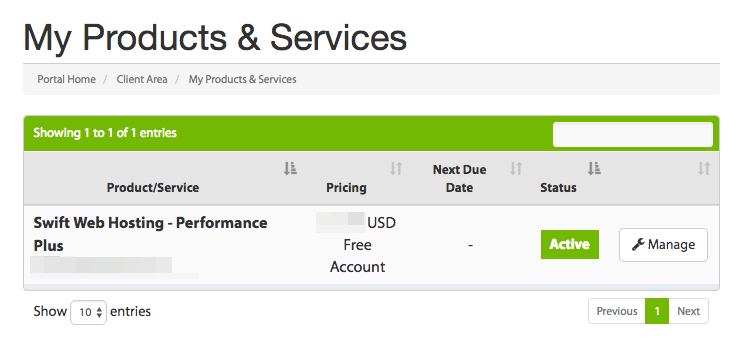
Under My Products & Services, choose Manage. Then, in the Actions sidebar, click on Login to cPanel. With this, cPanel will automatically open in a separate window.
Step 3: Select Your WordPress Installation
Once you’re in cPanel, click on the Softaculous link:
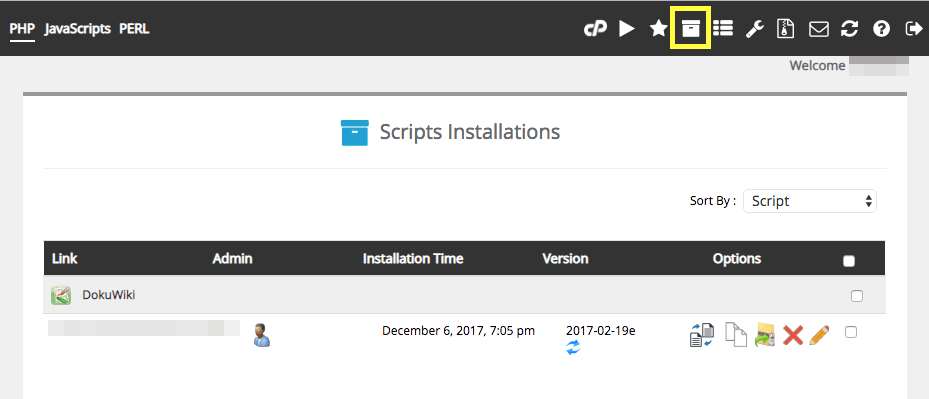
This will take you to the Softaculous page, where you can select the All Installations icon at the top of the screen:

You should see your WordPress installation listed here (in other words, your live site). Select the Create Staging icon next to your site’s entry to start setting up your staging site.
Step 4: Complete the Installation Process
At this point, you’ll be prompted to fill in some information about your staging site:
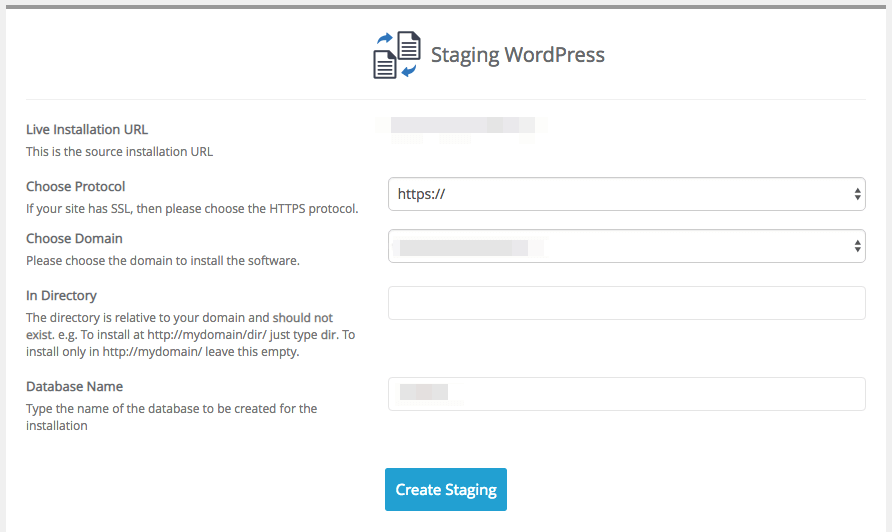
Provide the requested details, and then click on Create Staging. If you like, you can simply include the same credentials you use for your live site.
The size of your installation will determine how long it takes for your staging site to be ready. When it is, you can log in and get to work!
Conclusion
Using a staging site can save you unnecessary anxiety, and ensure that your site’s users have access to the information they need without interruption. While there are a few instances when it’s better not to use a staging site, this tool is highly recommended for just about all website administrators.
To get you started, we’ve shown you how to set up a WordPress staging site using Softaculous in your A2 Hosting control panel. You’ll just need to:
- Set up your staging environment.
- Log in to cPanel.
- Select your WordPress installation.
- Complete the installation process.
Do you have any questions about how to set up and use your staging site? Leave a comment and let us know!
Image credit: Pixabay.

