- Jan 12, 2022
 0
0- by Kate Meda
Sometimes our customers ask us here at A2 Hosting: “Why is WordPress so needlessly complicated?” While WordPress remains the most popular CMS (content management system) platform, there is a learning curve. If you find yourself confused by WordPress, you’re not alone. We recommend two leading solutions: A2 Hosting’s SiteBuilder or WordPress Elementor, a simple drag-and-drop editor for WordPress. Today, we’ll review how to use A2’s SiteBuilder for your website.
Step 1: Purchase a Web Hosting Package
The first step to using A2’s SiteBuilder is finding a hosting package. If you’re unsure how to choose the best plan, please consult our guide. Selecting a package comes down to three main questions:
- First, how many unique daily visitors does your site have?
- What resources do you need? (disk space, bandwidth, CPU)
- Do you need a managed or unmanaged solution?
We offer shared, VPS, and dedicated hosting plans with options for dedicated WordPress hosting and reseller hosting.
Upon checkout, select which A2 SiteBuilder plan you want.
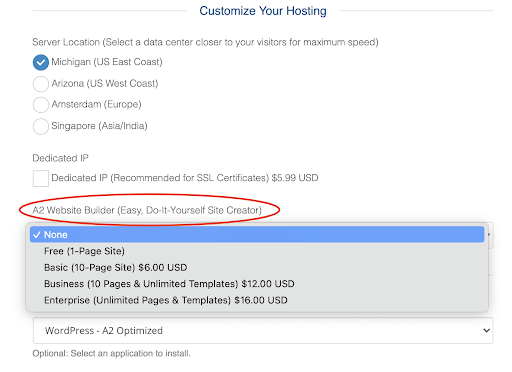
We offer four tiers of SiteBuilder: (all prices reflect USD)
- Free (1-Page Site)
- Basic (10-Page Site) $6/monthly
- Business (10 Pages & Unlimited Templates) $12/monthly
- Enterprise (Unlimited Pages & Templates) $16/monthly
The hosting plan you need depends on answers to the above questions. If you’re still not sure, contact our sales team today. They’ll assess your hosting needs and set you up with an appropriate plan.
Step 2: Log in to your cPanel to access A2 SiteBuilder
Once you purchase your website, log in to your cPanel to access A2’s SiteBuilder.
Follow these instructions:
- In cPanel, locate the Software section and click the A2 Website Builder icon.
- On the A2 Website Builder page, click the Create Site button.
Additional controls appear. Click Login under Actions. Then, it transfers you to the SiteBuilder. In this SiteBuilder, you can pick a theme, edit every page aspect, and add a blog or eCommerce integration.
Now you’re ready to design! Only three more steps until you’ve created the website of your dreams.
Step 3: Choose Your Template
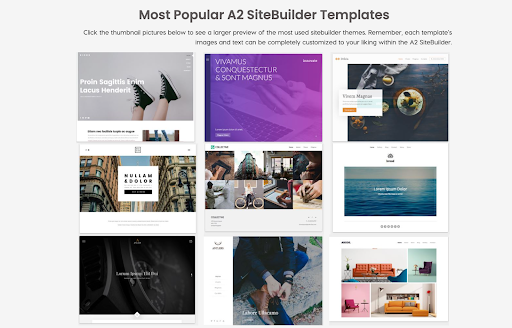
We offer various pre-designed templates to customize to your liking. You can edit every aspect of the template, from the layout to the color schematics.
Step 4: Add Content
You can’t sell a piece of a blank canvas at an art exhibition just as you can’t advertise your website without content. With A2’s SiteBuilder, you can add text, logos, headlines, videos, pictures, and any additional content to your website.
Step 5: Publish Your Site
Once you’ve chosen a template and added your first content, you’re ready to publish your website.
Click the Publish button and your website is off to the races! You can further edit your website at any time, whenever you need to add content or change existing content.
And that’s all there is to it! A2’s SiteBuilder offers:
- A plethora of pre-designed templates
- Easy drag and drop editing
- eCommerce capabilities
- SEO (search engine optimization)
- Social sharing across social channels
- Easy image uploads
- Easy video integrations
In only 5 steps, you no longer need to worry about WordPress complications. A2’s SiteBuilder gives you WordPress power in a simple form!
Frequently Asked Questions (FAQs)
Is the A2 SiteBuilder included in my web hosting package?
Yes, you can add SiteBuilder to any one of our plans, but the cost depends on how many pages you need to design. We offer a free SiteBuilder package for one page, but if you need to design additional pages, we offer higher-tiered packages.
Do I need technical expertise to use the A2 SiteBuilder?
No. We designed it for ease of use and for users of all experience levels. Even seasoned developers like it because of its ability to help you customize your website quickly and affordably.
Can I change my template after publishing my site?
Yes! You can change the website’s template at any time without losing any of the content.

