- Mar 03, 2021
 0
0- by A2 Marketing Team
As a reseller hosting provider, Google offers many services that you can use to help grow your business. However, jugging all of them can get tricky.
Fortunately, Google Site Kit can help. This popular plugin displays key Google Analytics, PageSpeed Insights, and Search Console data inside your WordPress dashboard. You can also use it to integrate additional Google services, including AdSense and Tag Manager, without having to edit your website’s code.
In this article, we’ll show you how to connect all of your favorite Google services to your reseller hosting website, to ensure easy access to all the data and features you need. Let’s get started!
An Introduction to Google Site Kit
Site Kit, Google’s official WordPress plugin, lets you connect and manage its suite of performance and analytics tools from your WordPress dashboard:

This includes Google Analytics, one of the most popular platforms for tracking and measuring web traffic. Today, countless business owners use it to analyze key metrics for their websites, such as session duration, pages per session, and bounce rate.
Google Site Kit also supports the AdSense platform, which you can use to generate revenue via mobile-responsive adverts that Google places on your website. To maximize your advertising earnings, Google tailors the adverts based on factors such as the visitor’s geographical location.
You can use Site Kit to access the Search Console directly from your WordPress account. This helps you track your site’s traffic and performance without having to access an external dashboard. In addition, you can use Search Console to optimize your content and increase your chances of appearing in relevant Google Search Engine Results Pages (SERPs).
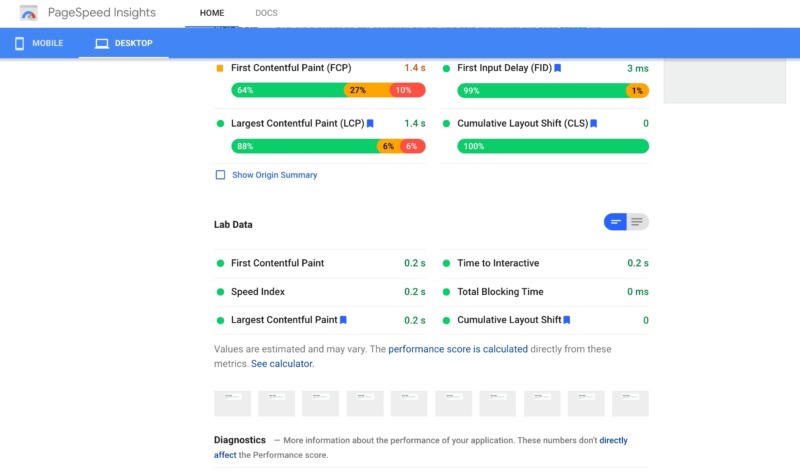
Site Kit also integrates with PageSpeed Insights (PSI). Unlike some competing analytics tools, PSI provides both lab and field data to deliver valuable insights into your site’s performance across both desktop and mobile devices:
A major advantage of Site Kit is that you can use it to connect to tools such as Tag Manager and Google Optimize, without manually adding code to your site’s header or footer. Note that you’ll still need to configure your tags and create your A/B tests in each tool’s dedicated dashboard.
Why You Might Want to Use Google Site Kit
As a hosting reseller, you’ll typically generate the majority of your sales from your website. This means that creating a high-performing, search-engine-friendly site is essential to the success of your business.
Google provides a wide range of services that can help you monitor and improve many aspects of your website, including analyzing changes in your site’s traffic, speed, and conversion rates. However, implementing and managing each of these services can be a time-consuming and frustrating process.
The Site Kit plugin aims to solve this problem by helping you integrate popular Google tools with your WordPress website. Then you can leverage and manage the services directly from your WordPress dashboard.
By making this information accessible from your admin area, Site Kit can help you keep a close eye on your site’s performance. The plugin can make it easier for you to identify and resolve problems as soon as they occur – and before they start negatively impacting your hosting sales and Search Engine Optimization (SEO).
While you’re monitoring your site’s overall performance, you’ll also be in a solid position to identify opportunities for improvement. By continuously refining your reseller hosting site, you can maximize your chances of securing new customers and growing your hosting business.
The sheer accessibility of this data is also great news if you run your reseller hosting business as part of a team. Even if you’re familiar with all of the tools and platforms, there’s no guarantee your co-workers will be Google experts. Using the Site Kit plugin, you can ensure that all of your team members have access to the data they need to make important decisions regarding your reseller hosting business.
How to Add Google Site Kit to Your Website
You can install and activate the Google Site Kit plugin from your WordPress dashboard. However, if you’re using a caching plugin, there’s a chance you may encounter a warning when you try to activate Site Kit.
If you come across this warning, we recommend temporarily deactivating your caching plugin. Then you can reactivate it as soon as you’ve finished setting up Google Site Kit.
To add Site Kit to your website, you can navigate to Plugins > Add New, and then search for it. Click on the Install Now button, followed by Activate.
Next, to configure the Google plugin, you can click on Start Setup:
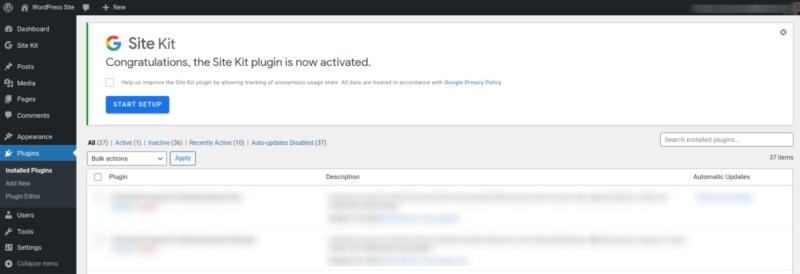
If you’ve navigated away from the setup screen and cannot currently see the above message, you can browse to Site Kit > Dashboard > Sign In With Google:

You can verify that you’re the website owner by logging into your Google account. When prompted, grant Site Kit permission to access your Search Console data and manage the list of sites and domains you control.
Next, Site Kit needs to add a verification token to your site’s Hypertext Markup Language (HTML) code. When prompted, click on Proceed > Allow.
As we’ve mentioned, the Site Kit plugin supports a range of Google services that you can add to your website. Most of them are optional.
However, Site Kit does require you to integrate Search Console with your WordPress site. If you haven’t previously connected to the Search Console, you’ll be asked to complete this step now. After the Search Console integration, you can select Go to my Dashboard:

Now you can monitor your Google Search Console data directly from your WordPress dashboard by navigating to Site Kit > Search Console. Note that it may take Site Kit some time to gather enough data to populate the WordPress dashboard, so you may not see an action-packed dashboard straight away.
How to Build a Better Reseller Website With Google Site Kit (5 Tips)
At this point, you can manage Google Search Console directly from your WordPress dashboard. However, you can also access a range of additional Google services.
To see what’s available, navigate to Site Kit > Settings > Connect More Services. From here, you can enable any of the services in the list. Let’s take a closer look!
1. Monitor Your Website Using Google Analytics
Google Analytics can help you understand what your visitors are doing and why. You can use that data to make smart decisions about the future of your reseller hosting business. Without access to an analytics platform, you run the risk of making critical business choices based on assumptions – rather than actual data.
Google Analytics provides insight into your website’s performance, including your traffic. As a hosting reseller, more traffic means more potential sales and greater revenue.
You can use Google Analytics to monitor and evaluate your traffic over time and identify what is or isn’t working. Then you can adjust your plans accordingly. Adapting is the key to growing your traffic and, ultimately, driving conversions.
Google Analytics also lets you assess how long visitors are spending on your reseller hosting website. Choosing a hosting provider is a huge decision for any business. If visitors are spending a significant amount of time on your site, it suggests that they’re engaged with your content, and may even consider making a purchase.
To add Google Analytics to your WordPress dashboard, select Set Up Analytics. Then you can enter your Google account details and grant the requested permissions.
At this point, you’ll have the option to use a Google Analytics 4 (GA4) property with Site Kit. Alternatively, you can select an existing Google Analytics property, or create a new one in the WordPress dashboard:
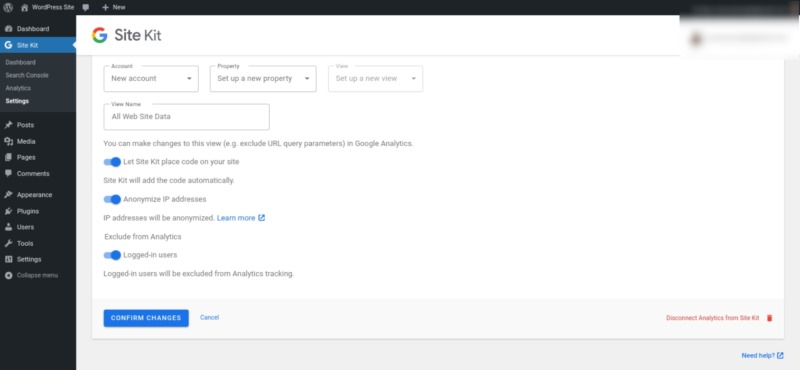
When you’re happy with your selection, click on Configure Analytics. You can access your analytics at any time by navigating to Site Kit > Dashboard > Analytics.
2. Use PageSpeed Insights to Test Your Mobile and Desktop Performance
As a hosting reseller, your website’s performance has the potential to drive conversions or alienate potential customers. Google has confirmed that it uses page speed as a ranking factor. By continuously improving your site’s performance, you can often significantly boost your SEO.
It’s difficult to overstate the importance of search engine rankings for your reseller hosting business. Studies show that 39 percent of online purchases are influenced by a relevant search.
Plus, over 40 percent of online revenue can be attributed to organic traffic. By using PSI to monitor and optimize your site’s performance continuously, you can climb those all-important search rankings, increase your traffic, and, hopefully, maximize your sales.
To configure PSI, simply select Set up PageSpeed Insights from the Site Kit settings screen, and the plugin will activate the PSI platform. You can view your data by navigating to Site Kit > Dashboard, and then scrolling to the bottom of the page:
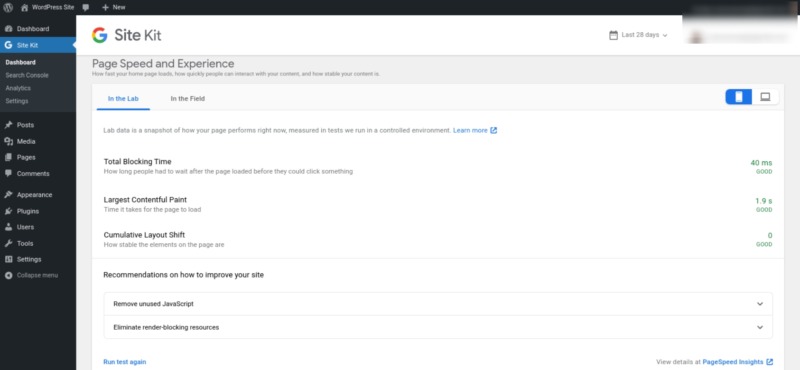
You can also use the tabs to toggle between PSI’s field and lab data. Field data is based on your website’s historical performance. Meanwhile, the lab data is based on the simulated load on a single device and a fixed set of network conditions. These data sets will often differ, so we recommend comparing and contrasting the information in both tabs.
Since the number of people who browse the internet via mobile devices is on the rise, we also suggest monitoring both the desktop and mobile data. You can switch between PSI’s desktop and mobile reports using the icons located in the upper-right corner of this section.
PSI’s mobile section displays how your website performs under a mobile connection. Naturally, the desktop tab highlights your website’s performance on a desktop computer.
3. Perform A/B Testing With Google Optimize
You can measure the success of past activities using tools such as Google Analytics. This provides valuable information that you can apply to your future activities.
However, A/B testing can help you take a more proactive approach by creating variations of your upcoming content. Then you can test how well these variations perform using a limited audience.
For example, you might build alternative landing pages for a new hosting promotion. Using A/B testing, you could identify which version drives the most conversions.
You can create and test variations using Google’s Optimize service. Optimize is different than the integrations we’ve explored in the above sections. Even after configuring the connection with your WordPress site, you’ll still create and manage your tests in the Optimize dashboard:
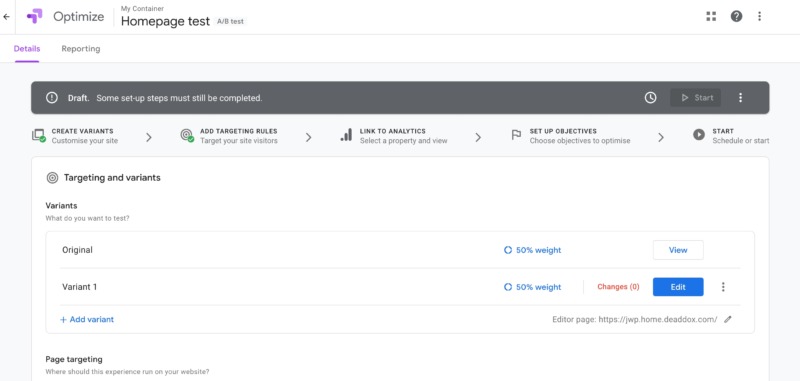
However, Site Kit does make it easier to add the Optimize scripts to your website. It also enables you to monitor your tests directly from the WordPress dashboard.
To enable Google Optimize, you’ll need to create an Optimize account. After logging into your account, select the Settings icon. This launches a panel that displays your container ID. Please make a note of this information, as you’ll be using it to complete the integration:
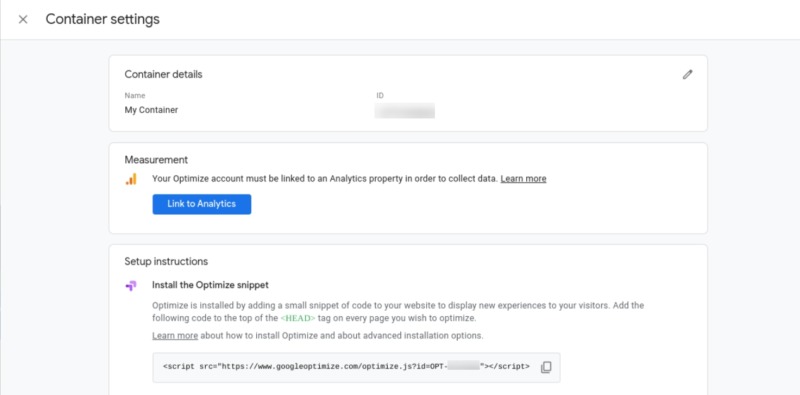
Back in the WordPress dashboard, click on Set up Optimize. When prompted, you can enter your container ID and click on Configure Optimize:
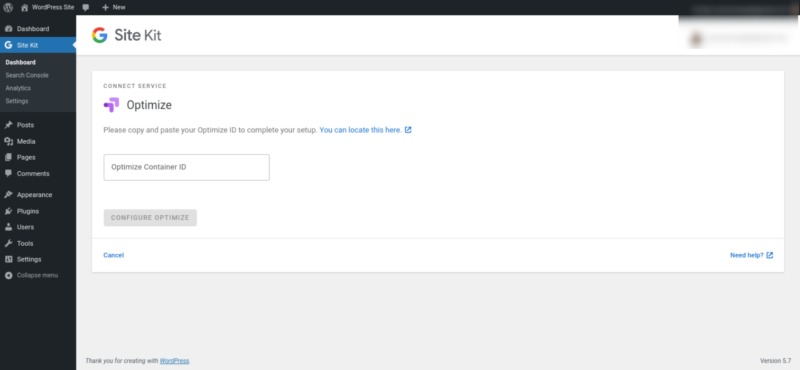
Once Optimize is connected to your website via Google Site Kit, you can create tests using the external Optimize console. To run a simple test, switch over to the Optimize dashboard and select Let’s Go. You can choose the type of test that you want to start:
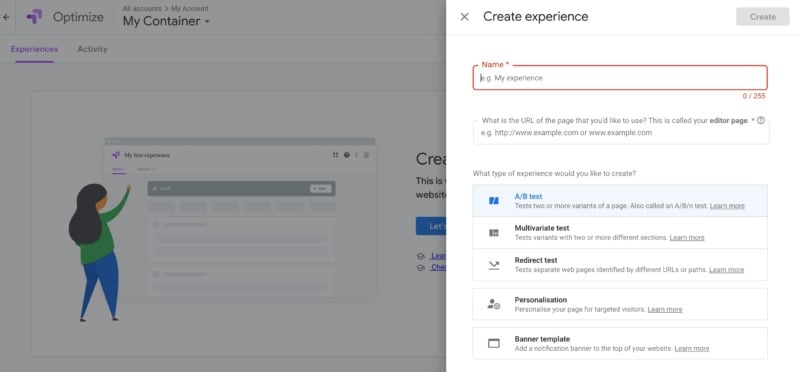
Next, enter the URL that you want to test, and Optimize will guide you through the process of building it. Once this test is up and running, it’ll appear in your WordPress dashboard.
4. Implement Powerful Event and Visitor Tracking With Tag Manager
You can use Tag Manager to add tracking codes to your website without having to write any code. This enables you to customize the data that’s sent to Google Analytics. By creating tags, you can monitor the specific metrics and events that you care about, even if Analytics doesn’t track them out-of-the-box.
Similar to Optimize, you’ll still need to create and manage your tags in the external Tag Manager dashboard. However, Site Kit does streamline the process of adding Tag Manager to your website.
To get started, navigate to Site Kit > Settings > Connect More Services from your WordPress dashboard. Next, select Set up Tag Manager:
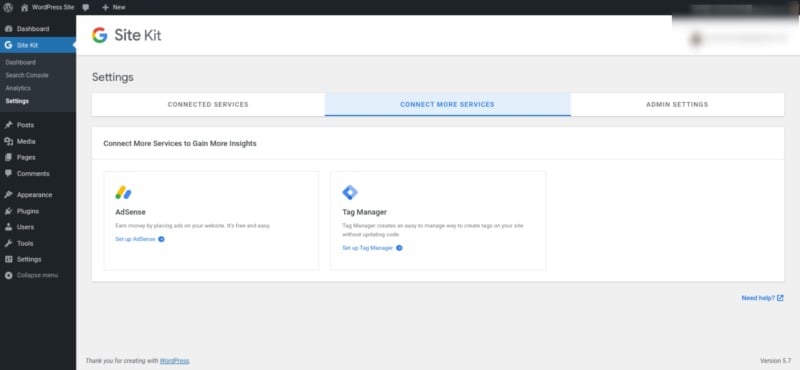
When prompted, you can grant Site Kit access to your Google Tag Manager account and components. You can also create a new container to use with your website by selecting Set up a new container:
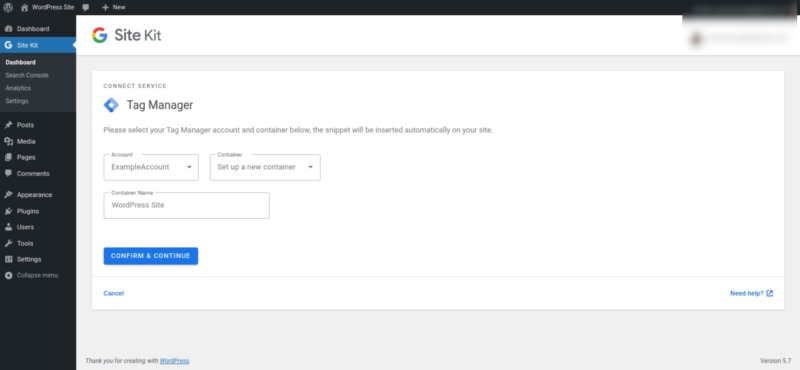
If you haven’t registered with Tag Manager, Site Kit will walk you through the account and container creation process. To connect Google Site Kit to your Tag Manager account, you can click on Re-fetch account.
WordPress should now display the account and container that you just created. Next, go ahead and click on Confirm & Continue.
At this point, Tag Manager is connected to your WordPress website. However, you’ll still create and manage all your tags in the Tag Manager dashboard.
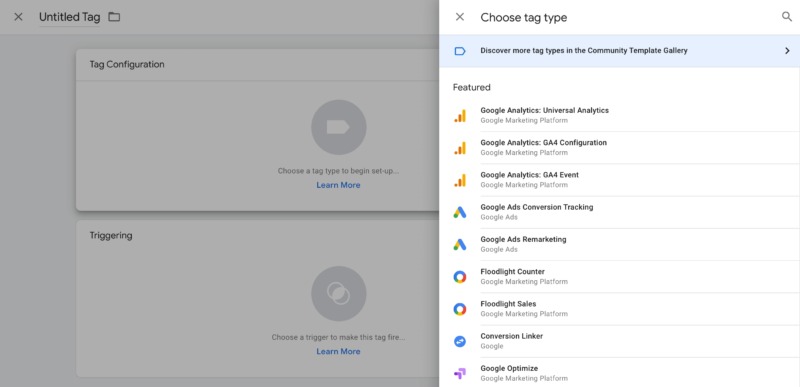
In the Tag Manager dashboard, you can create your first tag by clicking on Add a new tag. In the subsequent panel, give this tag a name. Then you can select anywhere in the Tag Configuration box and choose the type of tag that you want to create:
Next, click on the Triggering box. Here, you can choose the event that this tag should record:

Now you can follow the onscreen instructions to build your tag. When you’re ready to go live with your tag, click on Save > Publish.
5. Consider Using AdSense as an Additional Revenue Stream
As a reseller hosting company, your main revenue source will likely be providing fast and reliable web hosting services to your customers. However, it’s a smart idea to look for opportunities to diversify your income. This helps to protect your business against fluctuations in the market, including periods where you may be generating lower-than-average revenue.
Now that you’re using Site Kit to drive more people to your website, it makes sense to monetize the additional traffic. One option is to enroll your site in an advertising network.
Site Kit has full support for the Google AdSense platform. Therefore, you can use the plugin to quickly and easily place AdSense code on every page of your website.
Site Kit will automatically determine the ideal size, type, and placement for each advert on every page of your site. This can help you generate revenue without negatively impacting the visitor experience.
To enable AdSense integration, you can select Set up AdSense from your WordPress dashboard. When prompted, grant Site Kit the requested permissions.
If you don’t already have a Google AdSense account, Site Kit will guide you through the account creation process. If you do have an AdSense account, you can follow the onscreen instructions to connect your account to the Site Kit plugin.
After you’ve integrated Site Kit with your Google AdSense account, you’ll need to wait for Google to approve your website. Once it does, Google will start displaying advertisements on your site – and you can start collecting advertiser revenue!
Conclusion
Adding a suite of Google services to your website can be a time-consuming task. Thankfully, the Google Site Kit plugin will handle much of the heavy lifting for you. After installing this plugin, you’ll have access to a range of powerful Google services that you can use to improve your reseller hosting website.
In this post, we discussed five ways you can use Site Kit to enhance your site:
- Monitor your Google Analytics.
- Use PageSpeed Insights (PSI) to test your mobile and desktop performance.
- Conduct A/B testing with Google Optimize.
- Implement powerful event and visitor tracking with Tag Manager.
- Consider using Google AdSense as an additional revenue stream.
The Google Site Kit plugin can help you attract more traffic to your reseller website. However, the quality of your hosting packages is key to converting that extra traffic into loyal customers. To help maximize your conversions, we recommend offering web hosting that’s secure, reliable, and up to 20x faster than competing hosting solutions. Check out our reseller hosting plans to learn more!
Photo credits: Pexels.


